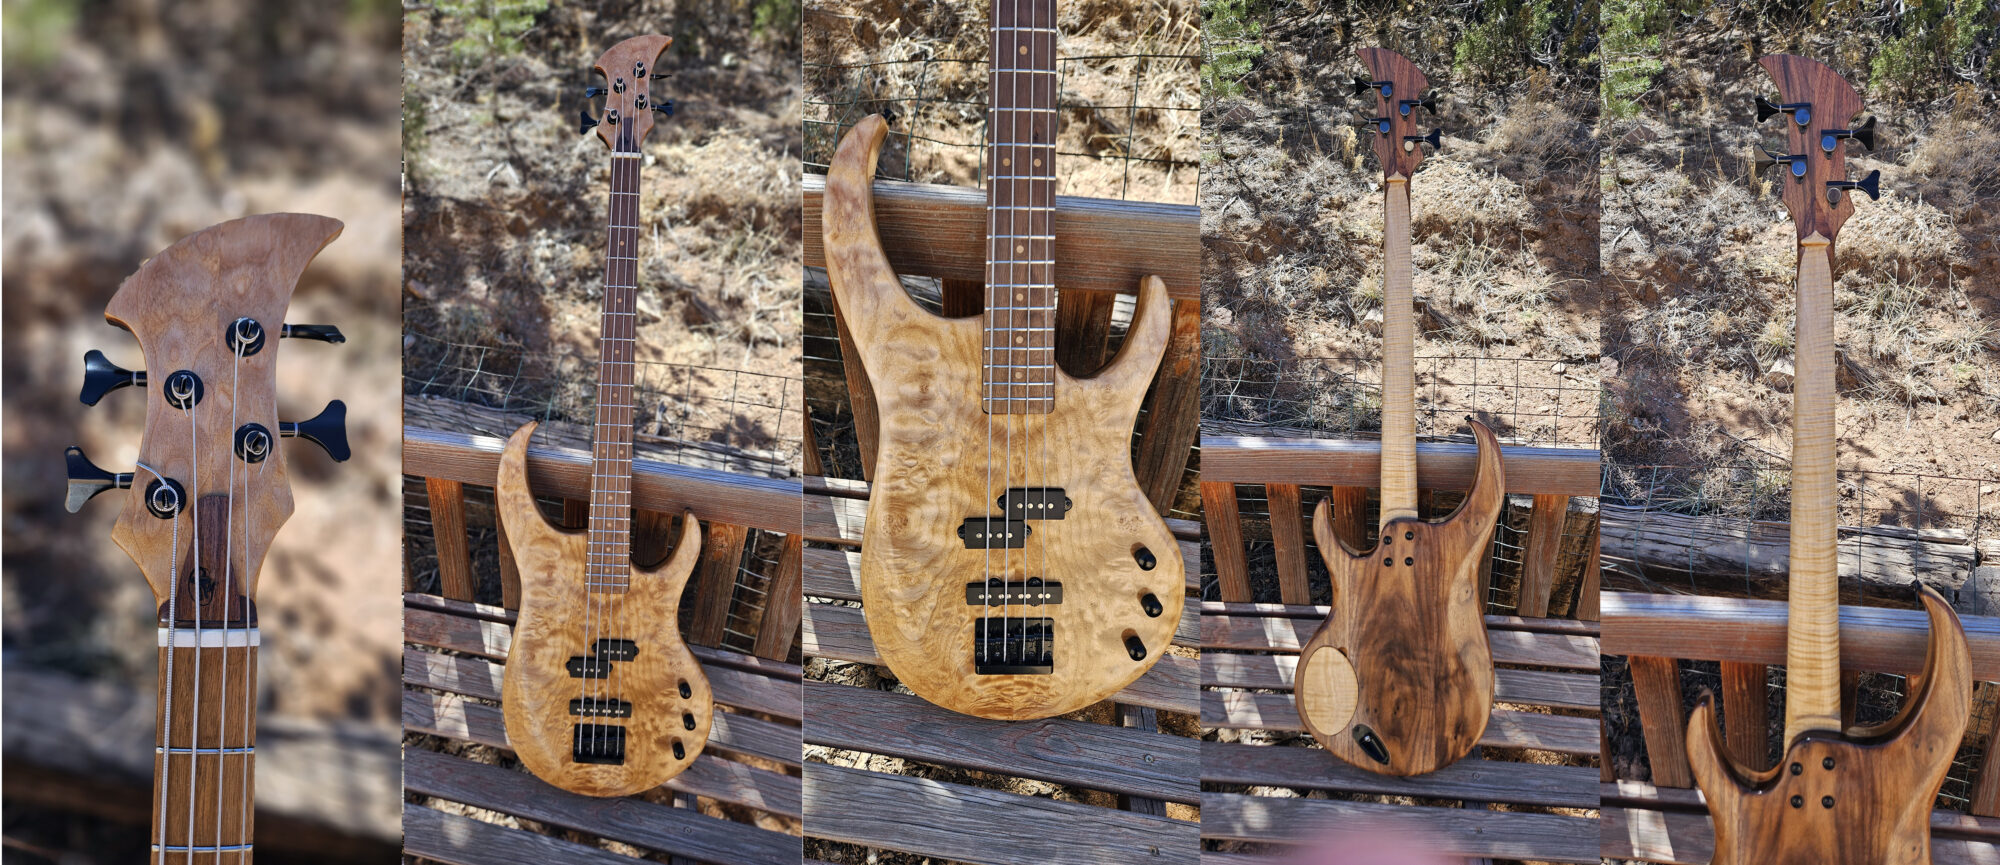
My son, Josiah, learned how to play the bass guitar in school last semester. He looked so cool up there at the recital, and it became clear to me… I needed to build him a sweet bass!
I started by buying a kit online, even though I intended to build it from scratch. I thought a cheap kit would be a good model for understanding what was needed. The kit included a body mostly inletted and shaped and a completed neck. I intended to build the body and neck entirely from scratch.
I began the build with the body. I found a great set of book-matched heavily figured maple for the top. It wasn’t quite thick enough for the entire body, so I decided to make the back of the body walnut. I got the walnut pieces from Home Depot, so they were already dimensioned. The body that came with the kit was a little small and boring. I made it bigger, a bit asymmetrical at the end and with longer and more strongly curved horns.
Since the body had the front maple and the back walnut, I made the neck back figured (tiger) maple and the fingerboard walnut. The back piece was a nice tiger-stripe piece, also from Home Depot. I had some concern about the right wood for the fingerboard… they are often made of something really hard like rosewood or ebony. But on a fretted instrument hardness isn’t quit as big a concern, and walnut is used really often.
For the headstock I reversed the pattern again and made the back walnut and the front some quilted maple. I customized the shape of the headstock based on something I just thought looked good.
Making a neck is tricky. The wood stock needs to be flat and straight and dimensioned properly. It was some work with the planer. The headstock is at a 13 degree angle to the neck. For that I made a scarf joint which required me to make an angle jig for cutting on the table saw. It worked just fine and I glued it up with epoxy. Next was the installation of the truss rod, which was straightforward. I used a 24” StewMac Hot Rod Low Profile 2-Way Truss Rod and routed it in the center of of the neck. The glue-up with the fingerboard went really well. Some initial shaping with the band saw was next to provide the taper for the neck. After this I used a 9.5” radius block on a jig to sand a slight curve in the surface of the fingerboard.
I decided to use only 22 frets instead of the common 24 (few people use those upper frets anyway). This shortened the neck about an inch on what was already a long guitar, and displaced the bridge a little farther to allow more space for the pups and a place to play the strings. The neck was bolted on. It required a lot of shaping to make the curvature in the back and shape the headstock, etc. I put in a decorative volute at the bend of the neck at the headstock. I also made ¼” maple dowel for the fretboard dots. The dots on the side of the neck I made from 1/8” aluminum rod.
For the frets, I used Fender standard bass medium jumbo fret wire with a pre-made 9.5” radius. I cut them in using a template one can generate online and mark out. I used a coping saw with a slender (0.02”) blade. Then I tapped them in with a small hammer using a little wood glue. I filed the ends and made sure they were all together flat using fine sandpaper on an 18” level. I crowned the ones that were a little high, and they came out pretty good!
For the nut I got some bone pieces online (I think they are water buffalo from somewhere in Asia). I shaped the nut using files and sanding. The top is at a bit of an angle.
For the headstock, I made a truss-rod adjustment cover out of walnut in similar shape to the headstock. I used recessed magnets to hold it on. I think it came out pretty good.
The tuning pegs are pretty standard and were the ones that came with the kit. Pretty straightforward. I do like how the black furniture looks on the wood.
The body was the other half of the big project. The overall shape was straightforward. I made router templates for inletting for the base of the neck, the pickup (pup) cavities and the electronics cavity on the back. Not easy and stressful cutting into the body, but it went pretty well. There were a couple small errors that I had to clean up, a little creatively, but no one needs to know! I drilled out routes for the wires and excavated a position for the jack.
I decided to put the jack on the back using a black Stratocaster style mount. This keeps the mount out of the way, at an angle pointing toward the end strap button so the player can wrap the cable around the base of the strap. I didn’t want the jack on the front to keep the front as clean as possible. I thought about putting it on the end, but I liked better the option of putting it on the back, out of the way.
I chose to use a PJ pickup configuration. This includes a precision-bass (P) set of pickups for the neck which have humbucker properties (opposite polarities in the pickups). However, I put the more treble pickup closer to the neck instead of the standard configuration (reversed the usual configuration) based on some advice I found online. The J (jazz) pup is pretty close to the bridge to pickup those low, jazzy tones. I used Firefly pickups which are regarded as among the better of the inexpensive pups out there.
The bridge I used is the one that came with the kit, but seems to be really fine and adjustable for saddle height and position to adjust for tonation. It was easy to install.
For the electronics, I decided to go with a configuration I found online that seems to be streamlined and clean. I included a blender potentiometer (pot) allowing blending from fully J to fully P, or anywhere in between along with a master volume pot and a master tone pot. This should allow for plenty of versatility.
I had to learn all about wiring and routing. I mounted the three pots and connected them to the jack and the pups from a rear access cavity. The cavity cover is a piece of tiger maple recessed into the back and attached using magnets, no screws.
I shielded all the cavities (jack, electronics and pups) with a couple layers of conductive paint. I decided to use it instead of copper tape to improve total coverage. Hopefully the conductive paint will reduce hum and microphonic stuff as much as possible.
Shaping the body was fun. I shaped the “belly curve,” the “arm bevel” and the “thigh curve.” The top has a gentle bevel most of the rest of the way around, but is flat in the middle.
I finished everything down to 320 grit. I also used a little TransTint Golden Oak dissolved in ethanol to bring out a bit of maple pattern better. About 8 coats of tung oil went on over all surfaces with treatment with 0000 steel wool in between.
The final assembly was fun… final installation of pups, bridge, knobs, wiring, tuning pegs and strings, and some final adjustment of saddle heights and pup heights.
I don’t play bass, so it will be fun to see if it actually plays well in the hands of Josiah!


Bless your heart!!! All the time I was reading about your construction I kept thinking how much Cal would love to watch/see/read about your efforts. He loved woods and he would have been a REAL fan of this!!! Thanks so much for sharing this.
Mary Craig.
Thank you! Thank you so much for your kind words.
8x5g2a
This is so awesome. As an avid guitar player I am in awe of your research and craftsmanship. Just incredible. The scarf joint was a chef’s kiss. Love the input jack, so pragmatic.
This will last Josiah for a lifetime. *Super Duper Dad High Five. Way to go!!!!
Thanks, Michael! I really appreciate your kind and supportive words. And thanks for teaching Josiah the bass!